How Token Provisioning Works
Provisioning is the process whereby a payment service provider (token requester) asks for a token to be created for a PAN.
Provisioning basically follows these steps:
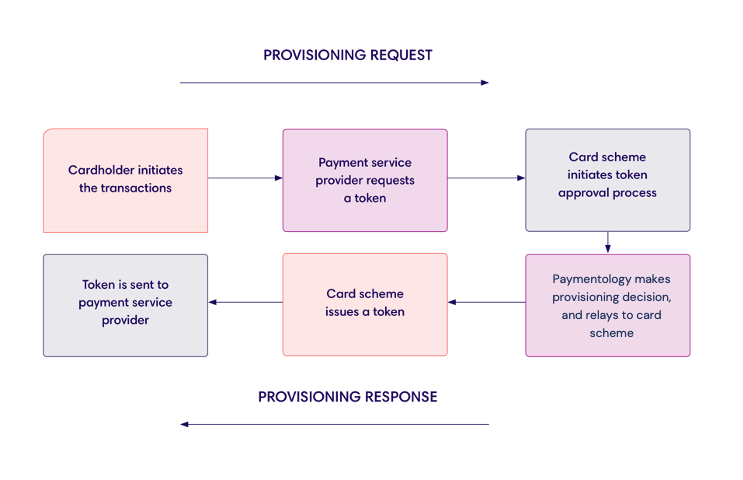
Step 5: If the token activation request is authorized, the card network generates a payment token. After tokenization, MDES will store that information in their secure token vault, while associating the card details to the created token.
Step 6: The unique token is sent to the payment service provider for completing the current transaction. The provider may also store the token for future payments. If the provider stores tokenized payment card data on a file in a database, which is used for making repeat purchases, such payments are called card-on-file transactions.
Types of Provisioning Methods
Paymentology’s Sprint platform supports the following two main methods for provisioning a token to incorporate a payment card into a digitized wallet:
- Push provisioning—this is in-app provisioning where a cardholder pushes the card from their card app directly into a digitized wallet with a click of the button.
- Manual provisioning—this is where a cardholder physically enters the card details into the digitized wallet.
Here is a table that compares the differences between push provisioning and manual provisioning:
| PUSH PROVISIONING | MANUAL PROVISIONING |
|---|---|
| OTP verification not required | OTP verification required. However, some wallets, such as Samsung Pay do not require OTP verification. |
| TAV certification required | TAV certification not required |
How Push Provisioning Works
Push provisioning is a generic capability that enables cardholders to “push” a token from the issuer experience into a destination wallet or merchant.
There are two main authentication measures implemented during push provisioning:
- TAV certification
- Card data encryption
Let’s talk about them in detail.
a) TAV certification
TAV (Token Authentication Value) is an encrypted digital signature that authenticates a push provisioning request from the token requester to the issuer/client. TAV certification is required to ensure the security and authenticity of the push provisioning process.
When a card is pushed on an XPay wallet, the client app will notify Paymentology that a card is being provisioned, and Paymentology needs to calculate its TAV value—based on the card number, expiry date, and CVV. After calculating this value, Paymentology will then pass it to MDES for MDES to tokenize the card. After tokenization, MDES will store that information in their secure token vault, while associating the card details to the generated token.
If a client app relies on Paymentology for TAV calculation, they’ll need to call the CalculateTAV API method, which is part of the Companion API. Paymentology will also need to get the necessary keys from Mastercard.
Note that even if Paymentology assists with TAV calculation, clients will still be responsible for other encryption tasks through the wallet to the MDES.
b) Card data encryption
Other than the TAV, the card information is also structured and encrypted, and passed to the Wallet Provider, and eventually to MDES. MDES actually receives the encrypted card data from the issuer via the Wallet Provider.
The information is encrypted using the PEPK (Play Encrypt Private Key) tool provided by Mastercard. The client does PEPK encryption as part of the direct integration to a digitized wallet.
For most wallet programs, other than Apple Pay, the Wallet Provider offers a simple pass-through mechanism for the encrypted data package. This mechanism ensures the security of sensitive data, without necessarily deploying the technology required to protect card information in conformance with PCI-DSS Standards.
The following steps are an example of a client app communicating with a Wallet Provider’s wallet application to initiate the digitization of the card:
- The client app uses proprietary APIs that link it to the issuer’s server, where the encryption of the card details is performed.
- The Wallet Provider publishes an API for the issuer to use to pass the encrypted card data to the wallet application.
- The wallet application uses proprietary APIs to pass the encrypted card data to the Wallet Provider’s server.
- The Wallet Provider server calls the MDES API to initiate the digitization request.
- MDES identifies the key that was used to encrypt the data from the issuer and decrypts the card details.
How Manual Provisioning Works
Manual provisioning is where the cardholder physically enters the card details, such as PAN, expiry date, and CVV, into the digitized wallet. It requires the cardholder to enter an OTP via the selected verification method, usually SMS or email, to verify that they indeed own the card.
In manual provisioning, Paymentology will use the RemoteMessaging API to handle various digitization tasks.
RemoteMessaging API
The Remote Messaging API for non-Companion clients is hosted on your platform and allows us to call you to send administrative advice messages:
- 3DSecure.OTP – process 3DS OTP token for an end customer to be able to complete the challenge of a live transaction
- digitization.activation – process MDES OTP token for an end customer to be able to complete the challenge and activate the wallet
- digitization.activationmethods – this message signals that a token provision has been made and requires a verification method in order to push the OTP validation
- digitization.event – used to communicate tokenization events in MDES
Let’s talk about the methods in detail.
This event happens at the beginning of the manual provisioning process. It signals that token provisioning is being requested, and the cardholder’s contact method needs to be verified for pushing the OTP. The OTP will confirm that the cardholder is the owner of the card.
In this instance, the MDES will send a notification to Paymentology that a cardholder is trying to provision their card on the XPay app, and that Paymentology needs to provide the cardholder’s mobile number and/or email address back to MDES so that they may pass it to the XPay.
Paymentology will then pass the verification request from MDES to the client via Digitization.activationmethods to retrieve the cardholder’s mobile number and/or email address linked to their card.
The client will respond to Paymentology with the required details. Paymentology will pass the data to the MDES to pass to the XPay app. The XPay app will then display the options the cardholder can select for receiving the OTP.
Digitization.activationmethods requires the type of contact method as well as the data for the method to be passed to it.
Also, no KLV fields are required to be passed. So, they’ll be no MessageData string included in the AdministrativeMessage request from Paymentology.
Once the cardholder selects their preferred method of verification, the XPay wallet will send this information to the MDES, and the MDES will send it to Paymentology.
Paymentology will then send an activation code via Digitization.activation to the client. The client will then pass an OTP to the cardholder, through their preferred contact method, to input it on their XPay wallet app.
Was this page helpful?