QR payments
The QR payments API allows you to create a contactless merchant payment system where customers can make electronic payments by scanning a QR code from a smartphone application. It’s a simple and secure way for consumers to push payments to merchants using their mobile money wallets or bank account balances.
Tutuka allows integration into Mastercard QR for the issuing and acceptance of QR payments, offering a safe, innovative way for consumers to scan and pay. Since it works as a plug-in to virtual or physical cards, having an existing virtual or physical PAN number allows for quicker and easier implementation of QR payments.
Benefits of QR payments

How QR payments work
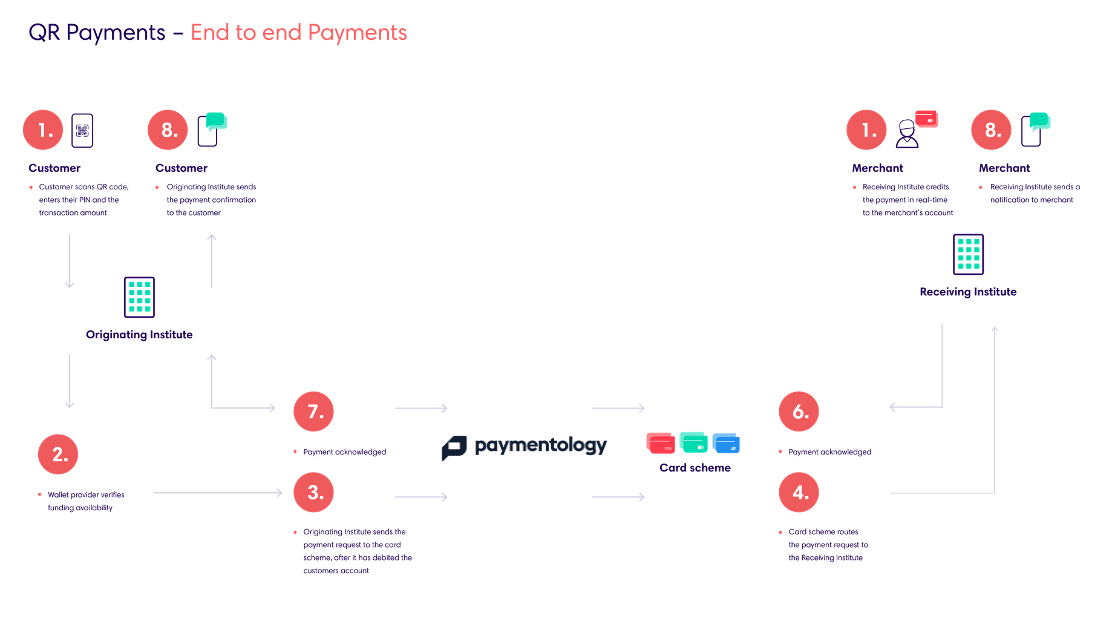
QR payments involve a four-party model where transactions occur between an Originating Institution (OI), the cardholder’s bank, a Receiving Institution (RI), and the merchant’s bank.
This is a typical QR transaction process:
- The cardholder initiates a QR payment transaction in which they pay by scanning the QR code the merchant displays at the point of sale.
- The merchant sends the transaction to the OI.
- The OI verifies the available funds and debits the cardholder’s bank account.
- The OI sends the payment to the RI.
- The RI credits the merchant’s bank account and sends a notification that the payment has been received successfully.
About the Originating Institution (OI)
The Originating Institution (OI) is the store of value provider that issues the customer’s card or account. When the consumer initiates a QR Payment transaction by scanning the merchants static QR code, the OI verifies the available funds on the consumer’s account and debits it. To transfer a QR payment to a merchant, you’ll need to make a call to the TransferPaymentToMerchant method.
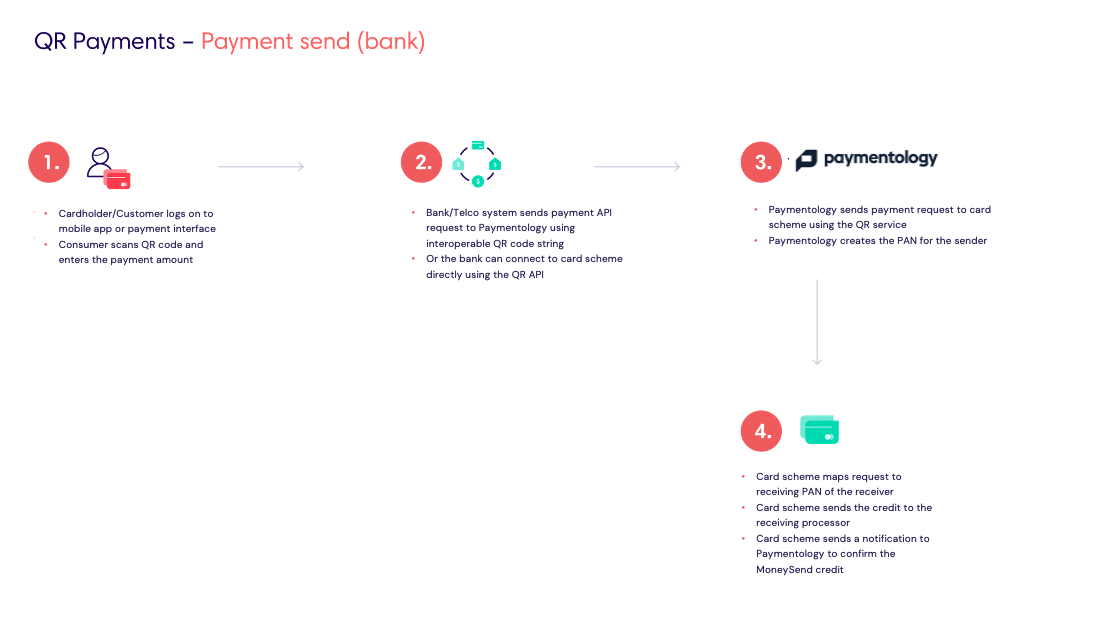
To transfer a QR payment to a merchant, you’ll need to make a call to the TransferPaymentToMerchant method.
OI reports
A report will be generated daily for all transactions that come from the OI. In an ideal situation, the payments pulled from the Originating Institution should match those pushed to the Receiving Institution.
You can access the report by making an HTTP GET request and downloading it as a CSV file.
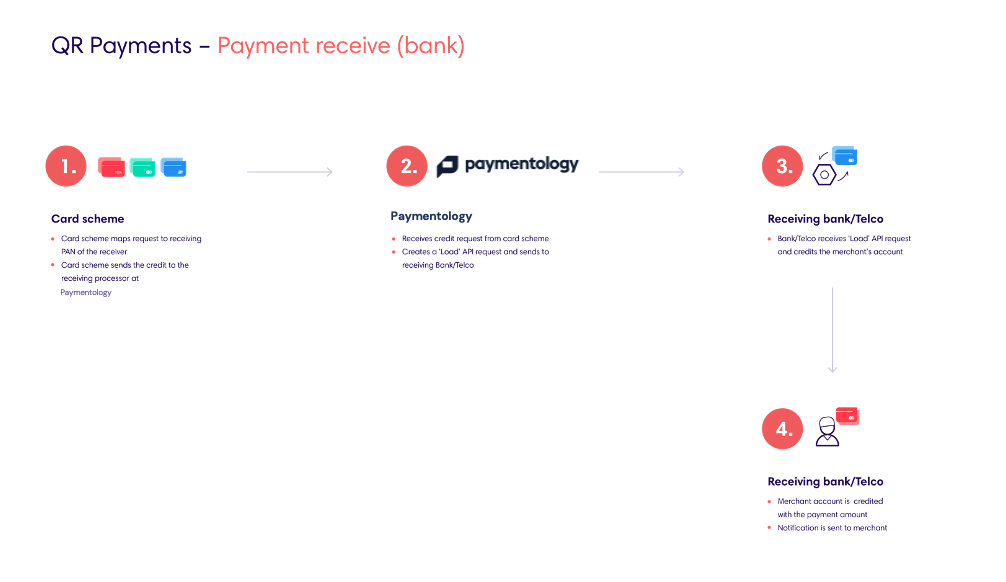
About the Receiving Institution (RI)
The Receiving Institution (RI) is the bank that holds the merchant’s account. The RI credits the merchant’s bank account and sends a notification that the payment has been received successfully.
The RI can make the following API requests:
- Make a call to the Load method to load funds onto the merchant’s wallet. If making the API request does not return any response, a timeout occurs, or an incorrect response code is returned, then a reversal will be triggered.
- Make a call to the LoadReversal method to reverse the loaded funds from a merchant’s wallet. If there is no response returned, a timeout occurs, or an incorrect response code is returned, then a reversal will be triggered.
It will be triggered ten times at 5-minute intervals until a valid response code is returned; thereafter, it results in a fail that Tutuka flags.
Using the SimPOS tool
The SimPOS tool can be used to facilitate a load to a merchant or a card, as well as an OI load.
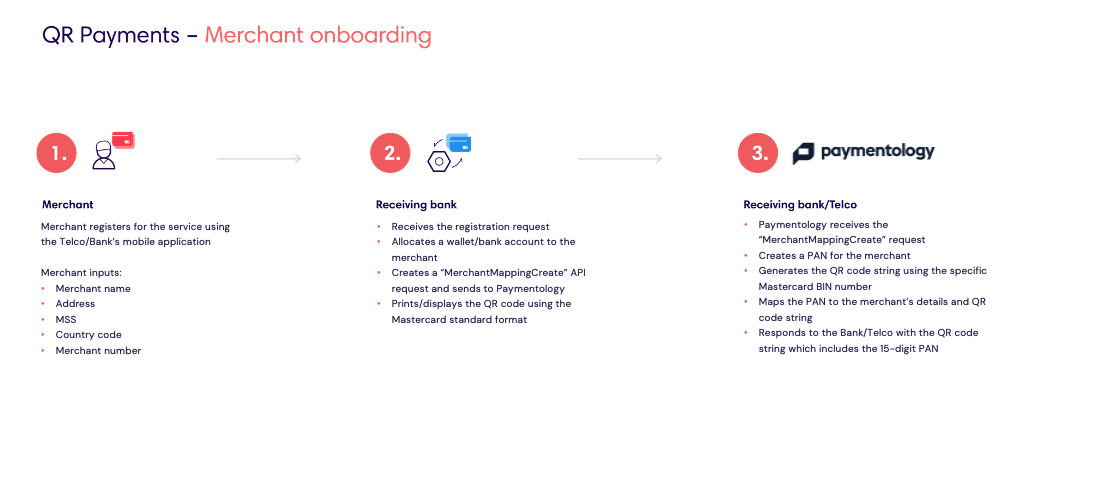
Onboarding merchants
Before a merchant can accept QR payments, you’ll need to onboard them first and create their QR data in the required format, as stipulated by the card scheme.
Onboarding with Mastercard
To create the QR code, you’ll use the Mastercard QR generator. You should ensure that the correct data is imported into the generator.
To produce the correct image, be mindful of any spaces at the beginning and end of the data inputs. Lastly, you can download the MasterPass QR Tester App to test that the QR code is correct and meets all Mastercard’s specifications.
To onboard your merchants, you’ll need to make a call to the Tutuka’s CreateQRData method. This method allows you to create a QR code that your merchant can display to enable them to receive payments.
The CreateQRData method accepts the following arguments:
- terminalID
- merchantCategoryCode
- merchantName
- merchantCity
- countryCode
- reference
- transactionID
- transactionDate
- optionalData
- checksum
Broadly speaking, the above arguments can be categorized into two types of data: authentication data and merchant QR data.
a) Authentication data
The terminalID and checksum fields are used to ensure the validity of transactions. These fields authenticate that the same data returned by Tutuka is received by you and sent back securely. You can think of the terminalID field and checksum field as a username and a password.
The terminalID is specific to you, and you only. Only Tutuka will know the password associated with that terminalID.
The checksum is more than just a simple password—it is a string generated from the actual method name and the text content of every field in the transaction encrypted against your private key (or actual password). It guarantees the authentication as well as the integrity of every piece of data within the transaction.
Note: You will be required to generate your own checksum and send it to Tutuka. We will then recalculate the checksum to ensure that no field has been tampered with. Only if both checksums are the same will the transaction be authenticated and verified.
You can use Tutuka’s Checksum Generator tool to test the checksum generation and implementation process manually.
b) Merchant QR data
The merchantCategoryCode, merchantName, merchantCity and countryCode fields provide more details about the merchant.
The reference field is the unique customer reference or identifier number on your system. This reference will be linked to the unique PAN, which payments will be loaded to before it is passed to the wallet.
After making a call to the CreateQRData method, the following data elements will be returned:
- resultCode
- cardnumber
- resulttext
- qrCodeImage
- qrCodeString
Was this page helpful?